Table of Contents
ToggleA finished deck transforms a backyard. But look underneath, and most reveal exposed foundations, support posts, and storage clutter that undermine the whole effect. A deck skirt, the vertical covering that runs along the base of your deck, solves this instantly. It hides what shouldn’t show, keeps debris and critters out, and adds genuine visual polish to your outdoor space. Whether you’re building a new deck or refreshing an existing one, the right skirt choice enhances both function and curb appeal. Here are seven practical, stylish approaches homeowners are using in 2026.
Key Takeaways
- A deck skirt is a vertical barrier that hides unsightly space beneath your deck while blocking pests and debris—making it essential for both curb appeal and functionality.
- Lattice panels remain the most affordable deck skirt option at $15–$40 per sheet, while composite and vinyl materials ($50–$200+) offer decades of durability without maintenance.
- Pressure-treated horizontal board designs create contemporary visual appeal but require restaining every 3–5 years, whereas composite skirts maintain their appearance year after year with just annual rinsing.
- Building codes may require ventilation openings in your deck skirt to prevent moisture buildup under the deck, so check local regulations before installation.
- Budget-friendly deck skirt alternatives include landscape fabric with plantings ($2–$5 per square foot), reclaimed brick, or corrugated metal panels for creative, cost-effective solutions.
- Most deck skirt installations take one weekend for a 12×16 deck, and you should match your chosen style to your home’s architecture and neighborhood aesthetic for the best visual impact.
What Is a Deck Skirt and Why You Need One
A deck skirt is a vertical barrier installed around the perimeter of your deck, typically running from the rim joist (the outer frame of the deck) down to the ground or a small clearance above grade. Think of it as the “baseboards” for outdoor living.
Beyond appearance, skirts serve real purposes. They block direct access to the space underneath the deck, which deters rodents, snakes, and insects from nesting near your home. They also catch leaves, grass clippings, and other debris that would otherwise accumulate under the deck and attract pests. In winter, a sealed skirt can help reduce wind chill and drafts if you have a deck over a crawlspace attached to your home.
From a code standpoint, openings under decks often don’t require a railing, but some jurisdictions have rules about how much light and ventilation must reach the soil below (usually to prevent moisture buildup). Check your local building department before sealing a skirt completely: you may need to leave vent openings or use a material with built-in permeability. If your deck is attached to the house, the connection point may also be subject to inspection, so be prepared to document your work.
Lattice Panels: The Classic Choice
Lattice remains the go-to for good reason: it’s affordable, visually light, and easy for a homeowner to install.
Benefits and Installation Basics
Pressure-treated wood lattice (typically sold in 4×8 sheets) costs $15–$40 per sheet depending on slat width and grade. The diamond or square openings allow airflow and light while obscuring the cluttered space below. It won’t completely block debris or deter small animals, but when combined with landscape fabric stapled behind it, you get a functional barrier.
Here’s the basic approach: Measure the height from the rim joist to the ground (account for slope, decks aren’t always level). Snap chalk lines on the rim joist and fascia to guide your furring strips (2×2 treated lumber). Screw 2×2 blocks vertically every 16 inches along the rim joist, then fasten lattice sheets to these blocks using 2.5-inch exterior-grade deck screws. Stagger joints where panels meet to avoid weak lines.
Key details: Use stainless steel or hot-dipped galvanized fasteners to prevent rust streaks. Pre-drill holes in lattice to reduce splitting. If you’re working alone, a helper makes aligning and screwing panels much easier. For a polished look, paint or stain the lattice before installation, touching it up later is messier. Plan for 2–3 coats if you’re staining to get even color. The whole job typically takes a weekend for a 12×16 deck.
Composite and Vinyl Skirt Options
If you want a skirt that looks good for decades without maintenance, composite and vinyl materials deliver. These engineered products resist rot, don’t require staining or painting, and handle wet ground contact without degrading.
Vinyl skirt panels ($50–$150 per 4×8 sheet) are hollow and lightweight, making them easy to install. They come in neutral tones and can be cut with a circular saw or miter saw (fine-tooth blade). Composite materials (made from wood fiber and plastic, like Trex or similar brands) run higher ($80–$200+ per sheet) but offer richer color depth and a more authentic wood look. Both resist UV fading, termites, and rot.
Low-Maintenance Solutions for Long-Term Appeal
The installation process is nearly identical to wood lattice, you’ll still need 2×2 pressure-treated furring strips to create a solid mounting surface. Composite and vinyl expand slightly with temperature, so check the manufacturer’s spec for spacing (usually ¼ inch at seams). Use composite-specific fasteners if recommended: standard stainless deck screws work, but some composites benefit from stainless fasteners to prevent thermal stress around screw holes.
Hose off your vinyl or composite skirt annually to remove pollen and dust. Unlike wood, you won’t sand, stain, or repaint. This means your skirt looks the same in year 10 as year 1, a genuine time-saver. The trade-off is higher upfront cost and less flexibility if you want to paint a custom color later. For a typical 200 square feet of skirt area, composite and vinyl will cost $600–$2,500 installed, depending on material choice and whether you DIY. This investment pays off if you plan to stay put for 15+ years and value your time.
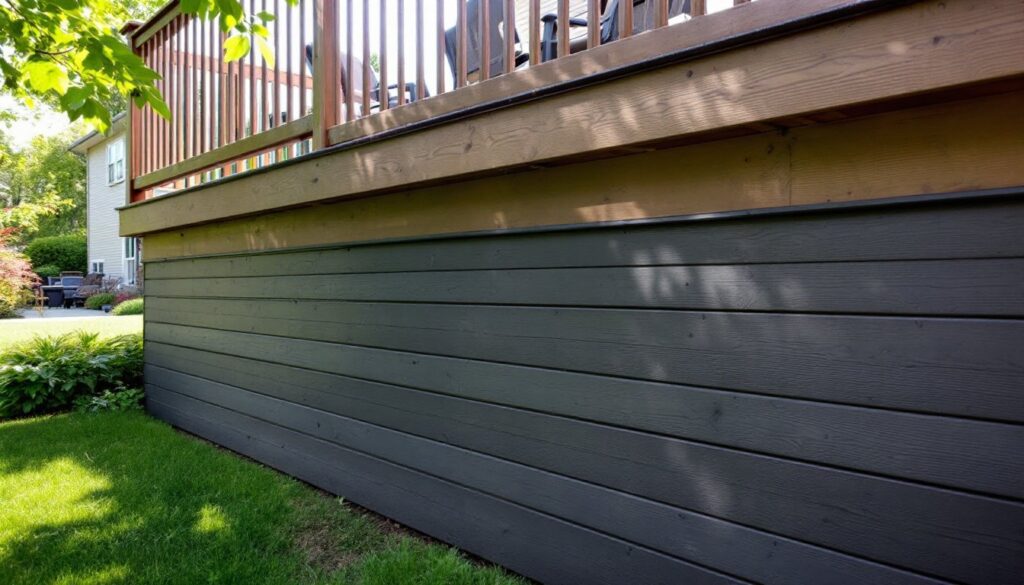
Natural Wood and Horizontal Board Designs
Some homeowners prefer the warmth of real wood and are willing to maintain it. A horizontal board skirt, stacked 1×6 or 1×8 pressure-treated boards with small gaps between, creates a slatted look that feels intentional and contemporary. It also allows air movement while creating visual interest.
Rip pressure-treated lumber to width using a table saw if you want uniformity, or source pre-milled boards from your supplier. Fasten boards to 2×4 vertical studs (spaced 16 inches apart) using 2.5-inch deck screws, two per board to prevent cupping. Stagger your butt joints so the seams don’t line up: this is called a random joint pattern and looks more professional. Leave ¼ to ½ inch gaps between horizontal boards for drainage and airflow.
Finish is critical. A solid-color exterior stain or paint adheres better than clear finishes on pressure-treated lumber and masks the inevitable weathering. Plan to recoat every 3–5 years depending on sun exposure and rainfall. A natural-looking rustic cedar skirt is stunning but requires more frequent maintenance (every 2–3 years) to prevent silvering and crack development. Consider your climate: in wet regions, wood absorbs moisture and develops mildew faster than in dry climates. Proper ventilation behind the skirt (those gaps you left) is essential for longevity. For a 12×16 deck, expect to spend $400–$800 on materials and 8–12 hours on installation if you’re methodical about layout and fastening.
Budget-Friendly and Creative Alternatives
Not every skirt needs to be conventional. Reclaimed brick, stone veneer, or corrugated metal panels are becoming more common in contemporary designs. A reclaimed brick facade fastened over plywood creates European charm for $10–$30 per square foot (materials only). Stacked stone veneer is lightweight and adheres with construction adhesive over a plywood substrate, professional-looking and semi-DIY-able at $15–$40 per square foot.
For a truly budget approach, landscape fabric and strategic plantings work. Staple heavy-duty landscape fabric (6-mil minimum) to your 2×2 furring frame, then plant tall ornamental grasses or shrubs in front. This costs $2–$5 per square foot and blends the deck into the garden rather than hiding the foundation. It requires annual plant maintenance but no structural upkeep. Corrugated metal panels (galvanized or pre-painted) run $8–$15 per sheet and install quickly with simple fasteners, they’re industrial and modern, not everyone’s taste, but they’re durable and cheap.
Before choosing a creative option, consider your home’s architecture. A rustic cabin pairs well with stacked stone: a mid-century ranch suits corrugated metal: a cottage benefits from lattice or painted slats. Southern Living or The Spruce for regional style inspiration, what looks right in the Hamptons might clash in Denver. Take photos of neighboring decks too: your skirt should complement, not contrast wildly with your surroundings. The most budget-conscious approach is to start simple (painted lattice) and upgrade later when you’ve settled on a look you really love.