Table of Contents
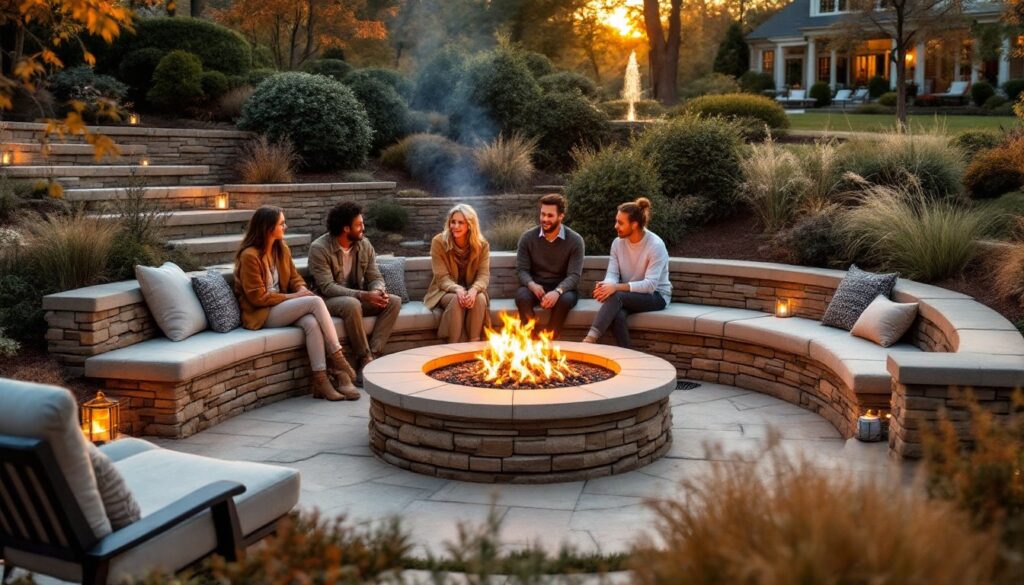
ToggleA sunken fire pit transforms a flat backyard into an inviting gathering space that’s both functional and visually striking. Unlike traditional above-ground pits, sunken designs blend seamlessly into the landscape, creating a natural focal point that draws people together. Whether you’re looking for a cozy weekend retreat or an impressive entertaining setup, sunken fire pit ideas offer flexibility in layout, materials, and style. The appeal goes beyond aesthetics, proper siting and construction mean better wind protection, easier conversation flow, and a more integrated outdoor living experience. This guide walks through the key design approaches, practical considerations, and what it takes to build one that fits your space and skill level.
Key Takeaways
- Sunken fire pits are positioned 12 to 24 inches below ground level, creating natural wind protection, better heat efficiency, and an inherently cozy conversation space compared to above-ground designs.
- Built-in seating around sunken fire pits works best at 18 to 24 inches above the pit floor, maintaining a 6 to 8-foot radius for comfortable heat exposure and conversation distance.
- Proper drainage planning is essential for sunken fire pits; install a 4 to 6-inch crushed stone base with a 1% slope to prevent water pooling and long-term maintenance issues.
- Sunken fire pit designs range from modern minimalist steel rings with concrete surrounds to rustic stacked stone with timber benches—choose the style that matches your home’s architecture.
- Check local building codes before starting; most jurisdictions require permits and mandate minimum setbacks of 10 to 15 feet from structures, and some restrict wood-burning pits entirely.
- A basic sunken fire pit project can be completed in 2 to 3 weekends by DIYers, though elaborate designs with seating and landscaping typically take 4 to 6 weeks and may justify hiring a professional contractor.
What Makes Sunken Fire Pits a Smart Design Choice
Sunken fire pits sit below grade, typically 12 to 24 inches below the surrounding ground level, which creates a natural wind buffer and confines heat more efficiently. This design reduces heat loss and smoke drift compared to raised or ground-level pits, making them more comfortable on breezy days.
The sunk design also creates a built-in conversation area. People naturally gather closer when seated at eye level around a fire rather than looking down at it from standing height. This inherent coziness is why resort designers favor sunken pits for outdoor lounges.
From a practical standpoint, a sunken pit requires less wall structure to contain the fire, sometimes just a stone ring or minimal retaining wall, which simplifies construction and reduces material costs. The ground itself provides thermal mass and containment. Most sunken pits also drain better than raised designs because water naturally moves away from the lowered center.
One honest trade-off: sunken pits need careful grading and drainage planning. If your yard tends to hold water, you’ll need a drainage layer or a slight slope away from the pit to prevent pooling. This isn’t a deal-breaker, just planning that pays off long-term.
Built-In Seating Sunken Fire Pit Designs
Built-in seating around a sunken pit combines functionality with design elegance. The most common approach is a stepped ledge or bench that runs partially or fully around the pit perimeter, dropping 12 to 16 inches below the surrounding grade and sitting 18 to 24 inches above the pit floor. This height works well for comfortable seating without being so close that heat becomes uncomfortable.
Materials for built-in benches typically include stacked stone, pressure-treated lumber, or poured concrete with a natural stone veneer. Pressure-treated wood offers easy DIY installation but needs annual sealing to resist weathering: concrete and stone last longer with minimal maintenance. Some homeowners pour a concrete base, then finish it with a stone or composite cap for comfort and durability.
Seating design choices:
- Full-circle benches accommodate more people but require level ground and consistent grading all around.
- Partial benches (three sides or an arc) work better on sloped lots and let you orient the open side for views or transitions to other yard areas.
- Individual seat walls with 12 to 18-inch heights scattered around the pit give flexibility, people can sit, stand, or reposition as they like.
When planning seating, account for clearance from the fire. A 6 to 8-foot radius from the pit center usually prevents excessive heat exposure while keeping people within comfortable conversation distance. Test seating height and distance on-site before committing, sit and hold a conversation across the pit space to confirm the layout feels natural.
Sunken Fire Pits With Water Features and Landscaping
Combining a sunken pit with water features, small streams, fountains, or basins, creates visual interest and softens the hardscape. The contrast of fire and water appeals to people, and the water element can help cool the immediate area on hot days. Landscaping 101 includes practical tips for incorporating a fire pit into surrounding plantings and site grading.
When adding water near a fire pit, keep the source at least 4 to 6 feet away to avoid steam clouds and mineral buildup from evaporating spray. A shallow basin or small recirculating fountain works better than a full pond nearby. Position water features so they catch evening light and create ambient sound without competing with conversation.
Landscaping around the pit anchors the design and manages drainage:
- Perimeter plantings of low-maintenance shrubs (boxwood, juniper, hydrangea) frame the gathering space and soften transitions.
- Ground cover (creeping thyme, sedge, ornamental grasses) softens the hardscape edges without requiring mowing around seating areas.
- Elevated planters or terraced beds on slopes create visual layering and improve water flow away from the pit.
Consider sight lines from your house and patio. A well-placed sunken pit with landscaping creates a secondary destination that draws people to explore and linger. Deciduous trees positioned to the north provide summer shade without blocking winter sun, a detail that extends usability across seasons.
Modern Minimalist vs. Rustic Sunken Fire Pit Styles
Modern minimalist sunken pits favor clean lines, uniform materials, and restrained design. A recessed steel fire ring set in a poured concrete floor surrounded by a low limestone or composite seat wall exemplifies this approach. Materials are typically monochromatic, blacks, grays, and whites, with no decorative masonry or ornament. This style pairs well with contemporary homes and low-maintenance landscapes. Minimalist pits look deliberate and designed rather than rustic.
Rustic designs embrace natural materials, irregular stonework, and intentional aging. Stacked flagstone or fieldstone walls, timber benches, and informal planting create warmth and character. Rustic pits fit older homes, cottage settings, and informal yards. Materials weather visibly over time, which adds to the appeal rather than detracting from it.
Hybrid approaches work too, a minimalist steel ring with rustic stone surrounds, or clean grading with informal plantings. Consider your home’s exterior and existing hardscape when choosing. A sunken pit that clashes with your house’s architecture reads as disconnected, not eclectic. Southern Living or Hunker for regional style inspiration that matches your home’s vernacular.
One practical note: rustic stonework requires more skilled labor if you hire out, and informal seating needs periodic maintenance (stone shifting, mortar repair). Minimalist designs are easier to DIY if you’re comfortable with concrete work, but they show wear (stains, cracks) more obviously than aged rustic materials.
Safety and Maintenance Considerations
Building code compliance varies by jurisdiction, but most areas require permits for permanent fire pits that are part of landscape construction. Check with your local building department before breaking ground. Many codes specify minimum distance from structures (10 to 15 feet from house walls or wooden overhangs), property lines, and vegetation. Some jurisdictions limit pit diameter or require metal grates. A few regions ban wood-burning pits entirely in favor of propane. Know your local rules upfront, it’s easier than removing an unpermitted pit later.
Ventilation and smoke matter more than many DIYers realize. A sunken pit’s depth helps contain smoke, but poor orientation relative to prevailing winds or nearby seating areas can make it unpleasant. Test wind patterns on-site before finalizing the pit location. If your yard is exposed to strong winds, consider a windbreak (low stone wall, dense planting) on the upwind side.
Fire safety essentials:
- Keep a garden hose or fire extinguisher immediately accessible.
- Clear dry leaves and debris from a 5-foot radius around the pit floor.
- Never leave a fire unattended, especially in dry seasons.
- Extinguish fires completely before leaving: cold ash can reignite.
- Install a steel grate or spark arrestor to contain embers if required by code.
Maintenance and drainage: After heavy rain, inspect the pit floor for water pooling. If it collects standing water, you need a drainage layer, typically 4 to 6 inches of ½-inch crushed stone under the grate, with a slight slope (1% grade) leading to a perimeter drain or swale. This prevents water from turning the pit into a bog. Stone seating requires occasional mortar repair and power-washing to prevent moss growth in damp climates. Check benches annually for frost heave or settling.
How to Get Started With Your Sunken Fire Pit Project
Planning phase:
- Identify the location, away from overhanging branches, power lines, and structures. Sketch the pit on your site plan with a compass to confirm prevailing wind direction.
- Check setback distances required by local code. Call before you dig to mark underground utilities (call 811 in the US).
- Decide pit diameter (4 to 6 feet is typical for 4 to 8 people). Mark it with chalk or rope and live with the layout for a day or two. Walk around it, imagine sitting there, confirm sightlines from your house.
- Determine seating style and materials. This drives cost and complexity, benches require more earthwork than a simple ring.
DIY vs. hiring: A basic sunken pit (dug, ringed with stone, no seating) is within reach for most DIYers with a weekend and some sweat. Expect to rent a small excavator (about $300–$400 for a day) or dig by hand if the pit is shallow and soil is workable. Built-in benches, complex drainage, or stone veneering justifies hiring a landscape contractor, especially on sloped terrain.
Materials to source:
- Excavation soil (haul away excess or redistribute for grading)
- Fire-rated bricks or a steel ring for the pit perimeter
- Crushed stone for drainage base
- Stone or wood for seating and surround (cost varies widely by material and region)
- Landscape fabric and mulch if adding plantings
Timeline: Simple projects finish in 2–3 weekends. Designs with extensive seating or landscaping take 4–6 weeks, accounting for material delivery and curing time (concrete needs 7 days before bearing weight). Start in spring or early fall when weather is stable, not during rainy season if your ground drains poorly.
Conclusion
A sunken fire pit is a rewarding project that elevates outdoor living without requiring advanced skills or a massive budget. Whether you choose minimalist lines, rustic charm, or integrated seating and landscaping, the key is matching the design to your property’s grade, climate, and how you actually use your yard. Start small, plan carefully, and don’t skip permits or drainage, those details separate a feature you’ll enjoy for years from a costly mistake. If you’re ready to commit, grab a shovel and start with the marking phase. A well-executed sunken pit becomes the gathering place your family gravitates to when the sun drops.