Table of Contents
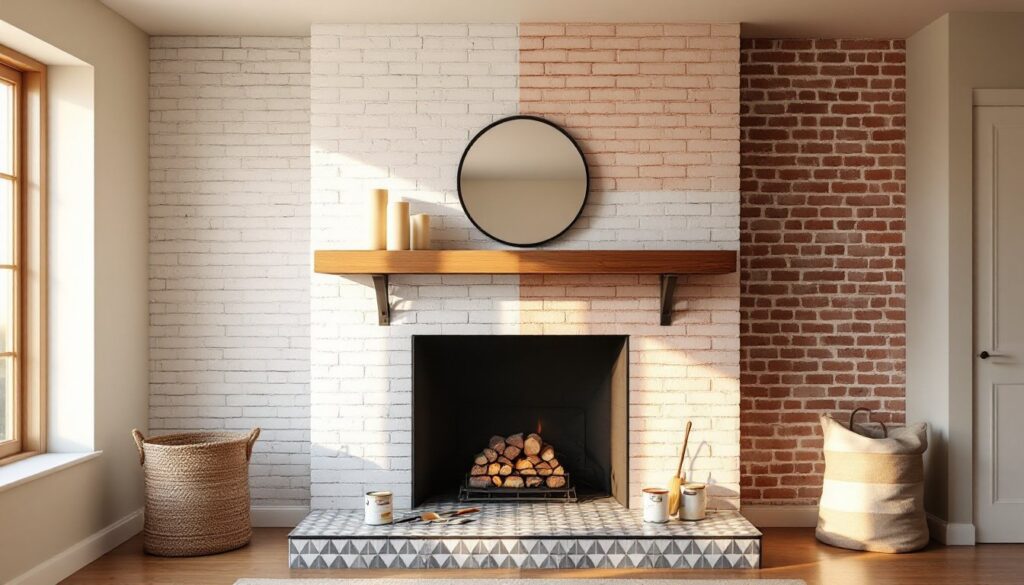
ToggleA brick fireplace anchors a room, but that dated orange or red masonry can drag down the whole aesthetic. The good news? You don’t need to tear it out. Homeowners and DIY enthusiasts have more straightforward options than ever to breathe new life into a brick fireplace, whether through paint, limewash, shiplap, veneer, or clever styling. We’ll walk through seven practical brick fireplace makeover ideas that deliver real impact, from budget-friendly cosmetic updates to higher-end structural upgrades. Each approach has trade-offs in cost, durability, and effort, so you can pick what fits your timeline and skill level.
Key Takeaways
- Painting brick is the fastest and most affordable brick fireplace makeover option, transformable in a weekend with proper masonry primer and 2–3 coats of exterior-rated paint.
- Limewash and whitewash preserve the natural brick texture while brightening your space, with limewash offering superior breathability and durability for older fireplaces with moisture concerns.
- Shiplap and stone veneer deliver dramatic visual transformations, but require careful measurement, proper ventilation planning, and professional installation for best results on high-end makeovers.
- Updating the hearth and fireplace surround with new tile, stone, or finishes can refresh your entire focal point without major reconstruction and provides excellent visual impact per dollar spent.
- A simple mantel refresh or replacement is one of the easiest and most affordable first steps in a brick fireplace makeover, instantly changing the aesthetic for $150–800.
- Layer cosmetic updates like painting or mantel styling before committing to structural projects like veneer or shiplap, allowing your budget and timeline to guide the scope of your renovation.
Paint Your Brick For An Instant Modern Update
Painting brick is the fastest, most affordable makeover. A fresh coat of masonry paint or latex-bonded acrylic transforms red or orange brick into clean white, soft gray, navy, or charcoal in a weekend. Two coats typically cover a standard fireplace surround.
Prep is everything. Dust and vacuum the brick thoroughly, then use a masonry primer on the first coat, this ensures adhesion and prevents peeling. Skip primer, and paint won’t stick. Fill any large gaps or spalls with masonry caulk before painting. Most brick is porous, so expect to need 2–3 gallons per fireplace face depending on size and color darkness.
Choose a paint rated for exterior masonry even if it’s indoors: interior brick endures heat cycling and occasional moisture. Semi-gloss or satin finishes hold up better than flat, especially near the hearth where dust and soot settle.
The downsides: paint can peel if brick is sealed incorrectly, and repainting becomes part of your maintenance cycle every 5–10 years. Also, painting seals the brick, so if moisture is trapped behind it, problems can develop over time.
Whitewash Or Limewash Your Fireplace For A Light, Airy Feel
Whitewash and limewash give a softer, more lived-in look than solid paint, they let the brick texture show through while brightening the space. Limewash is an old-fashioned mineral-based finish made from hydrated lime, water, and pigment. Whitewash is typically diluted white paint (50–60% paint, 40–50% water) applied thin for a translucent effect.
Limewash breathes better than modern paint, making it ideal for historic homes or older fireplaces prone to moisture issues. It’s self-healing, small cracks fill naturally, and lasts 5–7 years before fading gently. Application takes patience: multiple thin coats with a stiff brush, working section by section. Expect 3–5 coats for even coverage, though rustic inconsistency is part of the charm.
Whitewash is faster and cheaper to apply since you’re just thinning house paint, but it won’t breathe as well and may chip more readily near heat sources. Either way, test a small patch first, once on, these finishes are harder to remove than acrylic paint if you change your mind. References like This Old House offer detailed tutorials for both techniques.
Add Shiplap Or Sheathing For A Farmhouse Or Contemporary Look
Covering brick with shiplap (horizontal tongue-and-groove boards, typically 5–8 inches wide) transforms a fireplace into a focal wall. Shiplap works indoors for cosmetic fireplace surrounds, though you’ll need to nail it to furring strips (thin wood strips fastened to the brick) to create a gap for airflow.
Measure the fireplace surround, then locate studs or solid areas behind the brick where you can anchor furring. Use concrete fasteners (Tapcons or powder-actuated nails) to screw 1×2 furring strips horizontally every 16 inches vertically. Check with a level, even a slight bow telegraphs through shiplap and looks sloppy. Once furring is set, nail shiplap perpendicular, staggering joints, and leaving 1/8-inch gaps for wood movement.
Shiplap adds dimension and disguises an unevenly colored or damaged brick face, but it eats 2–4 inches of depth from the fireplace surround. On a small fireplace, that’s significant. Also, shiplap can trap heat if the gap behind it isn’t vented: consult your fireplace manual or a contractor if you’re unsure about clearances. Paint, stain, or leave shiplap natural after installation.
A quicker alternative is reclaimed wood sheathing or peel-and-stick shiplap panels, though adhesive-backed versions may not hold as long near heat.
Install Stone Veneer For A High-End Upgrade
Stone veneer, thin, lightweight slices of real or manufactured stone, delivers a luxury look without the cost or weight of full-depth stone. Real stone veneer typically costs more but ages beautifully. Manufactured veneer is uniform, cheaper, and fireproof-rated, making it safer near heat sources.
Veneer installs over a prepared brick surface using thin-set mortar (the same adhesive used for tile). You’ll need to clean the brick, apply a bonding agent or primer, then butter and press each piece into place. Grout fills the joints. The process is labor-intensive and messy, veneer projects often call for a second pair of hands or a professional, especially on large fireplace faces.
Cost varies wildly: manufactured veneer runs $3–8 per square foot: real stone climbs to $15–30+. Installation adds another $5–15 per square foot in labor if hiring out. The result, though, is dramatic and durable, veneer resists heat cycling, won’t peel, and hides damaged brick permanently. Check fire codes for your area: some jurisdictions require fireproof-rated material within a certain distance of the firebox.
Alternative: thin stone panels (glued or screwed) mimic the effect with less mess, though seams are more visible.
Update Your Fireplace Surround And Hearth
Sometimes the brick frame isn’t the problem, it’s the dated surround and hearth. Replacing the hearth tile (the floor directly in front of the firebox) and updating the facing material around the opening refreshes the whole fireplace without major reconstruction.
Hearth replacements involve removing old tile, prepping the underlayment, and setting new tile or stone with thin-set. Most hearths sit 4–6 inches above the floor, so the edge profile matters visually. A bullnose trim or V-cap edges look finished. For material, choose something heat-resistant and easy to clean, natural stone, porcelain, or quarry tile all work. Expect 2–3 days for removal and installation.
The fireplace face (surround) can be updated with new tiles, stone, or even metal accents. A sleek matte black surround or warm bronze finish around the opening modernizes an old brick fireplace instantly. Combined with fresh mortar joints or brick cleaning, these updates pull the whole focal point together. Home renovation ideas often overlook the surround, but it’s one of the most visible and impactful upgrades per dollar spent.
If the existing hearth or surround has structural damage or missing grout, address that first, it’ll affect any finishing material you install.
Refresh The Mantel And Styling For Maximum Impact
The mantel is the easiest, fastest fireplace update. Replace or refresh the mantel shelf itself, a new wood mantel in a modern stain, sleek metal, or even a reclaimed beam completely changes the aesthetic. Mantels come ready-to-install with brackets rated for weight: choose brackets that match your décor (modern black iron, antiqued brass, brushed nickel, etc.).
Removing an old mantel requires unbolting it from the brick or chimney: most use lag bolts or screws anchored with expanding anchors or masonry plugs. New installation involves drilling holes, setting anchors, leveling, and fastening. A 4–8 inch deep mantel is standard: anything deeper risks drawing dust and looking clunky.
Styling the mantel around the refurbished fireplace matters equally. A balanced arrangement, artwork, mirrors, candlesticks, plants, or woven baskets, draws the eye and frames the brick backdrop. Avoid overcrowding: a few well-chosen pieces outshine clutter. Publications like Southern Living and Country Living showcase mantel styling ideas from farmhouse to contemporary, offering real-world examples you can adapt to your space.
Mantel swaps are often the first step before painting or other major updates. They’re affordable ($150–800 depending on material), quick to install, and give instant personality without requiring permits or structural work.
Conclusion
A brick fireplace makeover doesn’t require a full gut renovation. Painting, limewashing, adding shiplap, installing veneer, updating the surround, or refreshing the mantel each deliver different aesthetics and price points. Start with simpler cosmetic updates if your budget is tight, then layer on more involved projects as time and funds allow. Prep work, quality materials, and honest assessment of your skill level make the difference between a project you’re proud of and one you regret. Your hearth can be modern, elegant, or rustic, it’s entirely your call.