Table of Contents
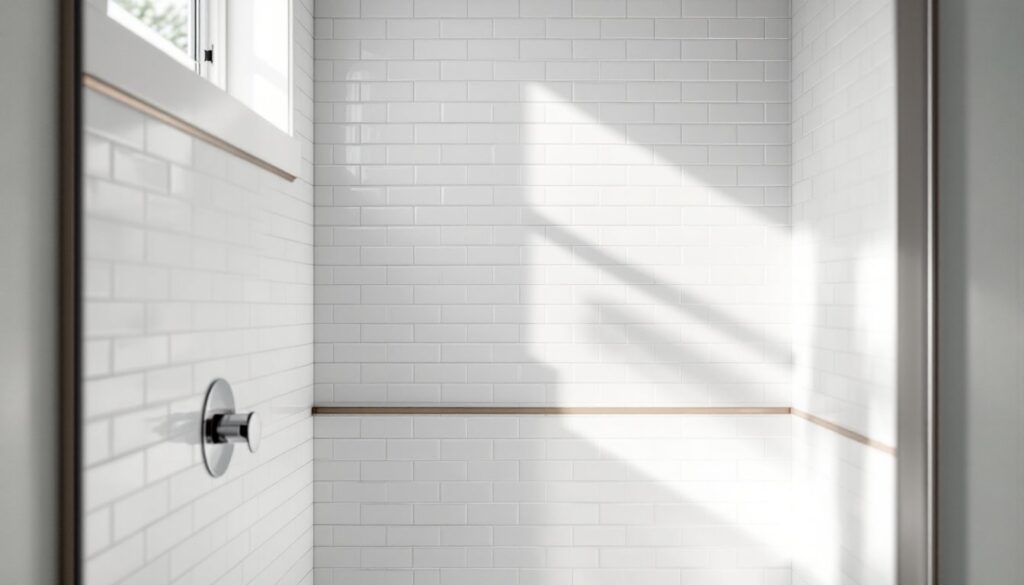
ToggleWhite tile remains the gold standard for shower walls, clean, versatile, and practically impossible to date. But “white tile” doesn’t mean monotony. Whether you’re gutting your bathroom or refreshing tired grout, the choices you make right now will shape how your shower looks and functions for years. From classic subway patterns to bold geometric layouts, today’s options let you build a shower that feels both timeless and intentional. This guide walks through seven design directions, each with practical installation notes so you know what you’re signing up for before you swing a trowel.
Key Takeaways
- White shower tile ideas range from timeless subway patterns to bold geometric layouts, offering versatile design options that won’t date your bathroom.
- Porcelain tiles outperform ceramic in durability and moisture resistance, making them worth the higher upfront cost for long-term shower performance.
- Installation method matters significantly: herringbone requires precision with a laser level, while large format tiles demand waterproofing membranes and cement board substrates to prevent degradation.
- Textured and matte finishes add visual depth to white tile but require more frequent cleaning than glossy surfaces, especially in areas with hard water.
- Colored grout, accent strips, and mixed materials like marble or metal trim prevent white tile from feeling sterile while maintaining a timeless, clean foundation.
- Geometric patterns and extra grout lines demand strict mold prevention and sealing schedules, making them better suited for lightly-used bathrooms than high-traffic family showers.
Classic Subway Tile: Timeless Style That Never Goes Out of Fashion
Subway tile, typically a 3 × 6-inch ceramic or porcelain rectangular, has dominated bathroom design since the early 1900s for a reason: it works. The 3:1 aspect ratio feels balanced, the running bond pattern (each row offset by half a tile) creates visual rhythm without fussiness, and the material costs less than fancy geometric options.
For shower walls, running bond subway is your safest bet. Lay tiles with the long edge horizontal: the offset creates enough visual interest that the eye doesn’t get bored, yet the pattern doesn’t distract. Standard white glazed ceramic runs $2–$5 per square foot installed (regional labor costs vary wildly). If you want longevity and fewer repairs, step up to porcelain subway tile ($4–$8 per square foot), which is denser, less porous, and shrugs off moisture better than ceramic over the long haul.
Installation demands straight lines and consistent grout joints. Use a wet saw for clean cuts on side tiles, and apply thin-set mortar with a 1/4-inch square-notch trowel held at 45 degrees. Grout, either unsanded (for joints under 1/8 inch) or sanded (for wider joints), matters more than people think. In a wet environment, epoxy grout costs twice as much but resists staining and mildew better. If budget is tight, cementitious grout with a sealer does the job, though you’ll need to reseal every few years.
Work on how to integrate a subtle color accent, a single row of light gray subway or a thin metallic stripe, without breaking the monochrome spell. The beauty of subway is its restraint.
Modern Geometric Patterns: Bold Layouts for Contemporary Bathrooms
Geometric patterns, hexagon mosaics, chevron grids, or interlocking shapes, inject personality where subway might feel safe. The catch: they’re fiddly to install and require more grout lines, which means more maintenance and more places for water to hide if sealing isn’t flawless.
Hexagon tile (1-inch or 2-inch across) creates a honeycomb effect that reads as modern without being harsh. Porcelain hexagon mosaics mounted on mesh backing sheets speed up layout: you set one sheet instead of dozens of individual tiles. Cost runs $6–$12 per square foot before labor. Chevron patterns, V-shaped interlocking, demand careful layout. You’ll waste tile on cuts and need a wet saw with a fine blade. The visual payoff is real: chevron draws the eye upward, making shower niches or the entire wall feel taller.
For geometric installs, mist the substrate (drywall or cement board) before applying thin-set, then press each piece firmly into place. Let the pattern sit undisturbed for 24 hours before grouting. Small grout lines (1/8 inch) look cleaner on geometric work, but they’re harder to keep stable, use sanded grout and a grout float held at a slight angle to avoid pulling grout out of joints.
One warning: if your bathroom has high traffic and you’re not obsessive about mold prevention, geometric tile’s extra grout lines are a liability. In a master bath or guest shower used sparingly, they’re fine. In a family bathroom where the shower runs six times a day, keep sealing schedule strict.
Herringbone and Chevron Arrangements: Adding Visual Movement and Dimension
Herringbone is the grown-up cousin of running bond. Instead of a simple offset, tiles are laid at 45-degree angles, creating a zigzag pattern that’s elegant and contemporary. Unlike random herringbone (which wastes tile), linear herringbone uses full-size rectangular tiles in a disciplined grid, so material usage is predictable.
3 × 12-inch porcelain tiles create bold herringbone, fewer grout lines per square foot than subway, but more installation skill required. Mark guide lines with a chalk snap: even pros will tell you that freehand herringbone drifts. Cut end tiles at 45 degrees using a wet saw with a diamond blade, rushing this step is how herringbone goes sideways (literally). Budget $8–$15 per square foot installed, depending on tile cost and labor.
Herringbone demands level substrate before you start. If your shower wall is out of plumb even by 1/4 inch, the pattern’s diagonal nature amplifies that error across the entire wall. This is where hiring a pro makes sense, they’ve got the eye and the tools to compensate mid-project. If you’re tackling it yourself, invest in a laser level and dry-lay tiles before applying mortar to spot problems.
Grouting herringbone is straightforward once tiles are set. The diagonal lines recede visually once grout is in, so the overall pattern reads as movement and dimension without feeling chaotic. Pair herringbone on the walls with simple rectangular tile on the floor for balance.
Large Format Tiles: Minimalist Appeal with Fewer Grout Lines
Large format tiles, 12 × 24-inch, 18 × 36-inch, or even 24 × 48-inch, define modern minimalism. Fewer tiles mean fewer grout lines, which translates to a seamless, spa-like appearance and less grout to maintain. The downside: large tiles are heavy, unforgiving of mistakes, and more expensive if a single tile breaks.
Porcelain large format is the standard for showers because it’s non-porous and dimensionally stable. Expect $6–$14 per square foot for material. Installation is trickier than it looks: large tiles are prone to lippage (uneven edges between adjacent tiles) if not set perfectly. Use a large-format tile spacer system with shims to keep everything flush. Thin-set mortar must fully support the tile’s back, use the 1/2-inch square-notch trowel and check behind tiles with a grout probe to confirm full coverage.
Large format tiles on shower walls work best on a cement board substrate, not drywall, because the mass and water exposure demand durability. Drywall absorbs moisture from behind the tile and can degrade over time. Waterproofing membrane between substrate and tile is essential, apply liquid waterproof sealant or sheet membrane (like Kerdi) to catch any grout seepage.
For visual interest without pattern complexity, alternate matte and glossy finishes or use a subtle linear grain in the tile. The scale of large format forgives white-on-white variation better than smaller tiles, where every tone shift reads as color.
Textured and Matte Finishes: Depth Beyond the Smooth Surface
Glossy white tile reflects light and cleans easily, that’s why it dominates showers. But matte and textured white tile add warmth and depth without abandoning white’s cleanliness or light-bouncing benefits. Matte-finish porcelain ($4–$8 per square foot) diffuses light softly, making the shower feel less clinical.
Textured surfaces, subtle relief patterns, stone-look finishes, or embossed details, catch light differently at each angle, creating visual complexity even in monochrome. Common textures include linear grooves, wavy surfaces, or tumbled stone appearance. The trade-off: textured tile is harder to keep spotless. Soap residue and hard water deposits settle into grooves. You’ll clean more often and may need a microfiber cloth or soft brush instead of just wiping. Matte finishes similarly require more aggressive cleaning than gloss to stay bright, if you use heavy hard water, a water softener upstream helps.
Installation is identical to smooth tile, but curing time matters more. Textured and matte tile can show grout haze (white residue) more obviously than gloss. Wipe grout gently with a damp sponge 24 hours after setting, not immediately, let it firm up or you’ll pull grout out. Use a grout haze remover product once fully cured (7 days) to clear any film.
For moisture management, textured tile is no less waterproof than smooth, porcelain is porcelain. The texture just affects appearance and maintenance effort. Pair textured walls with a smooth tile floor for practical balance.
Mixed Media: Combining White Tile With Accent Colors and Materials
Pure white can feel sterile if you’re not thoughtful. Mixing white tile with accent colors or materials, natural stone, metal trim, colored grout, or bold adjacent surfaces, adds character while keeping the foundation clean and timeless.
Colored grout is the easiest way to introduce accent. Light gray, warm beige, or pale blue grout with white tile shifts the mood without ripping out tile. Epoxy grout comes in dozens of colors and resists staining. Costs maybe $50 more for a small shower, but the visual shift is significant. You could also use a comprehensive guide to home design to explore color pairing ideas before committing.
Accent strips of contrasting tile, say, a 6-inch band of light gray subway at chair rail height, break up a large white field. Or run a thin metallic or glass border tile horizontally. These accents work best at eye level where they anchor the space. Install accent strips on setting bed just like regular tile: they’re not a structural element, so visual placement matters more than structural logic.
Stone accents, natural limestone, marble, or slate insets, pair beautifully with white ceramic. Marble is porous and needs sealing even in a shower, but a small accent area is manageable. Mix marble inserts at regular intervals (every six tiles, for instance) for sophistication without fuss. A professional bathroom design resource can inspire patterns and material combinations.
Metal finishes, brass, brushed nickel, or matte black, in trim, shelving, or fixtures complement white tile without competing. The contrast grounds the space and prevents white from feeling cold. Keep metal finishes consistent (don’t mix nickel and brass) for cohesion.
Conclusion
Your white shower tile choice sets the stage for how your bathroom functions and feels for years to come. Whether you’re drawn to subway’s timeless simplicity, herringbone’s visual movement, or large format’s minimalist calm, the real decision is about your tolerance for maintenance and your willingness to spend on durability. Porcelain over ceramic, sealed grout over unsealed, waterproof substrate over drywall, these choices cost more upfront but age better. Start with the pattern that speaks to you, then work backward through materials and installation method. If you’re unsure about the technical side, a site like Remodelista’s bathroom inspiration shows real installations you can learn from. The confidence to commit comes from understanding what you’re building and why.