Table of Contents
ToggleA vanity backsplash often gets overlooked in bathroom remodels, but it’s one of the easiest ways to elevate your sink area without major construction. Whether you’re dealing with plain drywall or looking to replace old tiles, a fresh backsplash can transform the whole room’s visual impact. The bathroom vanity backsplash has become a focal point in 2026 design trends, offering homeowners an opportunity to inject personality and protect walls from moisture damage at the same time. From timeless subway tile to bold patterned designs, the options let you balance practical durability with aesthetic appeal. Let’s walk through seven trending approaches you can tackle yourself or use to brief a pro.
Key Takeaways
- A vanity backsplash bathroom sink backsplash protects walls from moisture damage and mold while serving as a visual focal point that elevates your entire bathroom without major construction costs.
- Subway tile remains the most popular and DIY-friendly option, with ceramic and porcelain varieties offering durability, affordability ($1–5 per square foot), and clean lines that work with any color palette.
- Natural stone and marble create luxury aesthetics but require 6–12 month resealing, pH-neutral cleaning, and often professional installation due to weight and delicate maintenance needs.
- Mosaic and patterned tiles add personality through accent strips and bold designs, but smaller pieces create more grout lines requiring increased sealing and maintenance compared to larger tile formats.
- Painted and shiplap backsplashes offer budget-friendly alternatives best suited for low-moisture areas like powder rooms, though they require repainting every 3–5 years and don’t provide the durability of tile.
- Save 15–25% on material costs by choosing simple layouts like running bond patterns, renting specialty tools like wet saws, and tackling surface prep yourself while outsourcing structural repairs.
Why a Vanity Backsplash Matters for Your Bathroom
A vanity backsplash isn’t just decoration, it’s a moisture barrier and a practical investment. The wall behind your sink takes daily splashing from handwashing, toothbrushing, and showering, so untreated drywall or outdated finishes can develop mold, discoloration, and soft spots over time.
Installing a proper backsplash protects wall material and makes daily cleaning easier. Tile, sealed stone, and other water-resistant finishes shed water and resist staining. You’ll spend less time scrubbing and more time enjoying the space.
Beyond function, a backsplash is a visual anchor. Because homeowners spend significant time looking at their vanity mirror, the wall behind the sink sets the tone for the entire bathroom. A thoughtful design choice here can make a modest bathroom feel intentional and polished without the cost of a full remodel. This is why backsplash styles have exploded in popularity, they deliver maximum impact for the investment.
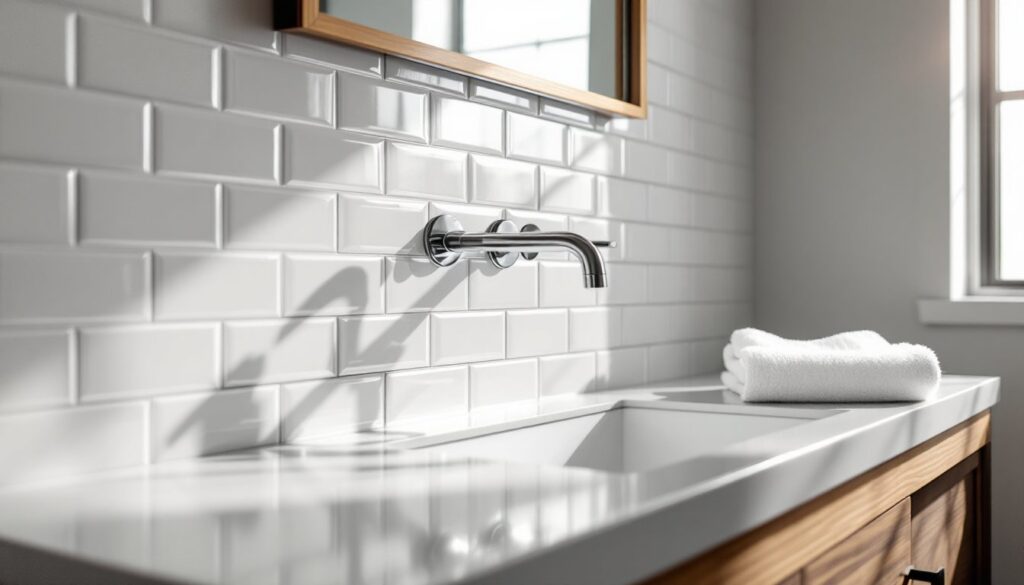
Subway Tile Backsplash: A Timeless Classic
Subway tile remains the go-to for DIYers and designers alike. The 3×6 inch rectangular tiles offer clean lines, work with nearly any bathroom color palette, and are forgiving for first-time tile installers.
Subway tile comes in ceramic, porcelain, and glass. Porcelain is more durable and water-resistant than ceramic, making it ideal for wet zones. Glass subway tiles add a lighter, more contemporary feel but show watermarks and soap residue more visibly, keep that in mind for your maintenance comfort level.
Layout matters as much as the tile itself. A classic running bond (offset rows) is easiest and looks professional. Herringbone or stacked patterns look sophisticated but require more precise cuts, especially around the vanity edges and corners.
For a standard 48-inch vanity width and 18-inch backsplash height, plan for roughly 24 tiles (accounting for grout lines at approximately 1/4 inch). Choose a non-sanded grout for joints thinner than 1/8 inch: sanded grout is too coarse and can scratch certain tile finishes. Seal grout after it cures (usually 72 hours) to prevent moisture penetration and discoloration.
Installation: Use a notched trowel (typically 1/4×3/8 inch for subway tiles) to apply thin-set mortar. Set each tile with light pressure, using spacers to maintain even gaps. After 24 hours, apply grout, let it cure, and seal. Most DIYers can complete a simple subway tile backsplash in one weekend.
Mosaic and Patterned Tile Designs
If you want personality without overwhelming the space, mosaic and patterned tiles bring visual interest while staying functional. Mosaic mixes multiple tile shapes, sizes, and colors, think small hexagons, triangles, or mixed marble chips, to create texture and depth.
Mosaics work particularly well as accent strips. You might run a 6-inch mosaic band horizontally across the vanity backsplash, flanked by solid subway tiles above and below. This layered approach keeps the eye moving without demanding constant visual attention.
Patterned tiles, encaustic, geometric, or hand-painted designs, offer bold options. A 4×8 inch patterned tile can serve as a statement piece, especially in guest bathrooms or powder rooms where splashing is lighter. Mix patterned tiles with solid borders or subway strips to avoid visual chaos.
Keep in mind: smaller mosaic pieces require more grout lines, meaning more sealing and maintenance. Patterned tiles with intricate detail can make small bathrooms feel cramped if overused. Budget extra time for layout planning and cutting around fixtures. If you’re new to tile work, consider starting with a simpler pattern (geometric stripes, for example) before attempting intricate hand-painted designs. Home design inspiration from industry leaders can help you visualize how these patterns work in real bathrooms before committing.
Natural Stone and Marble Options
Marble and natural stone bring luxury and permanence to a vanity backsplash. Marble lends a sophisticated, upscale appearance, while granite, slate, and limestone offer durability and a more grounded aesthetic.
Important caveat: Natural stone requires more maintenance than ceramic or porcelain tile. Marble and limestone are porous and soft: they etch easily with acidic cleaners and stain without proper sealing. If you choose natural stone, commit to sealing it every 6–12 months and using pH-neutral cleaners only.
Marble and stone tiles cost 2–4 times more than ceramic subway tile, and some require professional installation due to weight and precision. A 12×12 inch marble slab can weigh 5–6 pounds: improper support or adhesive failure leads to cracking and costly repairs.
For a DIY-friendly natural stone approach, consider slate or honed granite in smaller tiles (6×6 or 4×4 inch). These materials are less delicate than polished marble and offer visual warmth. They still need sealing and careful cleaning, but they’re more forgiving than marble for a first-timer.
Curved marble backsplashes have gained momentum in 2026, creating soft, sculptural forms that break away from flat grid patterns. Curved marble designs showcase contemporary bathroom trends and offer an elegant alternative if you’re willing to invest in custom fabrication or professional installation.
Painted and Shiplap Alternatives
Not every backsplash needs tile. Paint and shiplap offer budget-friendly, quick alternatives, though they’re purely decorative and require diligent maintenance in wet areas.
Painted backsplashes work best in powder rooms or guest baths with minimal splashing. Use high-quality bathroom paint (satin or semi-gloss finish with mildew resistance) applied over clean, primed drywall. Satin finishes handle moisture better than flat finishes. Expect to repaint every 3–5 years, especially in high-moisture zones. Protect with a clear, mildew-resistant topcoat for extended durability.
Shiplap, horizontal tongue-and-groove boards, adds texture and farmhouse charm. Install boards over moisture-resistant drywall or cement board, not standard drywall. Seal the shiplap with waterproofing primer before painting. Shiplap has gaps between boards where water can seep behind: it’s best reserved for drier areas or where splashing is indirect.
Both options are DIY-friendly: painting requires only brushes, rollers, and surface prep: shiplap installation needs a nail gun and basic carpentry skills. Neither requires grout or mortar expertise. But, be honest with yourself about your bathroom’s moisture levels. If your vanity faces a shower or sees heavy daily use, tile or sealed stone is a more durable long-term choice.
For inspiration on contemporary finishes, home design and renovation shows regularly feature creative painted and paneled backsplash solutions that blend style with practical maintenance considerations.
Budget-Friendly Installation Tips for DIY Projects
A backsplash renovation doesn’t need to drain your budget. Here’s how to keep costs down while maintaining quality:
Start with prep work. Remove old tile (tedious but necessary) using a cold chisel, hammer, and grout saw. Wear safety glasses and a dust mask: old tile and grout kick up silica dust, a serious lung hazard. Repair any damage to the wall substrate with patching compound and let it cure fully. Uneven walls cause tiling headaches: spend time here to avoid costly mistakes later.
Choose affordable materials. Ceramic subway tiles ($1–3 per square foot) outperform pricier alternatives for cost-per-durability. Porcelain runs slightly higher ($2–5 per square foot) but outlasts ceramic in wet areas. Avoid impulse splurges on premium finishes unless they fit your long-term plan.
Rent specialty tools. A wet saw (for clean tile cuts) costs $40–60 per day to rent versus $200+ to buy. A grout float and trowels you can pick up cheaply: a saw is the bigger expense. Most tile suppliers rent wet saws to customers.
Stick to simple layouts. Running bond or stacked patterns minimize waste and cutting. Herringbone and complex mosaics look stunning but waste 15–25% of material through cuts and mistakes. Save complex patterns for a second project after you’ve gained confidence.
Measure twice, buy once. Calculate your exact tile count and add 10% for breakage and future repairs. Pre-mix only the grout you need: dry grout is cheap to waste, but mixed grout hardens and can’t be salvaged.
Do the work yourself, but outsource structural issues. Installing tile is a weekend project: removing and repairing damaged wall framing is not. If you discover structural rot, water damage, or electrical wiring during prep, pause and call a pro. Fixing those issues first prevents costly backsplash failures.
Conclusion
Your bathroom vanity backsplash is an opportunity to blend durability with design in a high-impact, manageable project. Whether you choose timeless subway tile, bold mosaics, luxurious stone, or budget-conscious paint, the key is matching the material to your bathroom’s moisture level and your maintenance comfort.
Start with honest prep work, choose materials that fit your skill level and lifestyle, and don’t rush the installation. A well-executed backsplash refreshes your entire bathroom and adds real value, both functionally and aesthetically.