Table of Contents
ToggleA cramped closet doesn’t stand a chance against a well-planned closet ideas strategy. Whether you’re working with a walk-in, a reach-in, or that awkward corner nook, smart storage solutions can transform wasted space into organized function. This guide walks through nine practical bedroom closet ideas, from installing custom shelving and double hanging rods to adding mirrors and lighting, that homeowners and DIY enthusiasts can tackle themselves or adapt to fit their specific needs.
Key Takeaways
- Start with careful measurement and inventory of your current closet space to identify exactly what you’re storing and how much hanging, shelf, and drawer space you need.
- Install custom shelving and double hanging rods to instantly double your vertical storage capacity and accommodate both long garments and folded items without expanding your footprint.
- Use drawer dividers and vertical folding methods like the KonMari file-fold technique to maximize drawer capacity and keep folded clothing visible and organized.
- Add LED lighting and mirrors to transform your bedroom closet into a functional space that eliminates shadows, reduces color-matching frustration, and expands perceived space.
- Implement labeling, seasonal rotation, and clear storage containers to maintain organization long-term and prevent chaos in your closet ideas system.
Assess Your Current Closet Space and Storage Needs
Before you buy a single shelf bracket or organizer bin, measure your closet carefully and identify what actually needs to fit inside. Grab a tape measure and document wall width, depth, and height, but also note the location of studs, shelves, hanging rods, and any obstructions like door swings or vents.
Next, inventory what you’re storing. Hang-ups like jackets, shirts, and pants typically claim the most vertical real estate, so estimate how much linear hanging space you really need. Folded items, sweaters, jeans, undergarments, work better on shelves or in drawers. Shoes, accessories, and out-of-season gear fill the remaining nooks. Be honest: if you haven’t worn it in two years, it’s taking up space a current piece of clothing could use.
Measure your hanging clothes. Most garments need 42 to 48 inches of vertical clearance on a standard closet rod, though longer dresses and coats may need 60+ inches. This detail matters when you plan to add a second rod below the primary one. Taking 15 minutes to sketch a rough overhead layout prevents costly mistakes during installation.
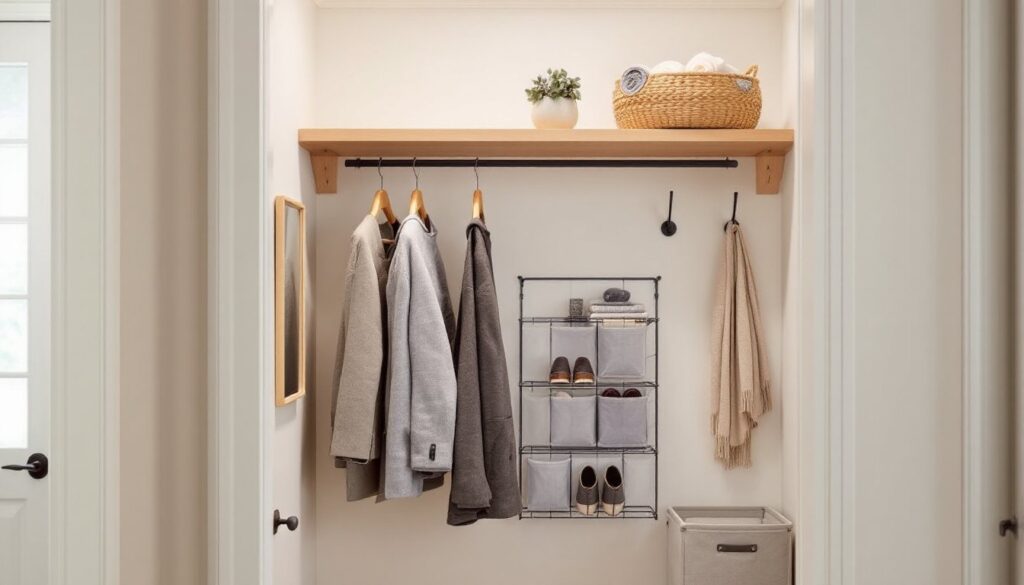
Install Custom Shelving and Double Hanging Rods
Custom shelving and double hanging rods are the backbone of a functional closet. If your closet currently has a single rod running the full length, you’re likely wasting the vertical space below it, that’s prime real estate for a second rod, folded storage, or shelves.
For shelving, solid pine or plywood shelves (¾ inch thick minimum) work well for closets and resist sagging under typical loads. Install them with heavy-duty shelf brackets rated for at least 25 pounds per bracket pair: most DIYers fasten brackets to studs using 2½-inch wood screws. If studs don’t align with where you want shelves, use heavy-duty drywall anchors, though studs are always stronger. Space shelves 12 to 16 inches apart to accommodate folded clothing and storage boxes, tighter spacing wastes vertical headroom: wider spacing can make smaller items hard to reach.
Adding a second hanging rod is straightforward once the first rod is out. Measure down 42 to 48 inches from the main rod and install a lower rod using the same bracket approach. A ⅝-inch diameter closet rod is standard and will support winter coats and regular clothing. Ensure brackets are rated for dynamic loads (clothes hanging and moving), static-rated brackets fail quickly in closets.
Benefits of Double Hanging Systems
Double hanging instantly doubles your vertical storage capacity without expanding the footprint. Shirts, blouses, and lightweight jackets fit comfortably on the upper rod: pants, folded skirts, or shorter hanging items claim the lower rod. This configuration suits seasonal rotation as well, swap winter and summer wardrobes without overstuffing or doubling up on hangers.
Double rods also reduce wrinkles and creasing since each garment has its own space. One caveat: drawers and shelves underneath the lower rod create access challenges, so reserve the area directly beneath the lower rod for pull-out baskets or rolling bins rather than fixed shelves.
Use Drawer Dividers and Vertical Organization
Drawer dividers and vertical storage methods keep folded items visible and within reach, eliminating the dreaded “out of sight, out of mind” closet mess. Wood or plastic dividers ($15–$40 per set) slide into existing drawers, creating compartments for socks, underwear, scarves, and belts. This approach beats stacking because you see everything without rummaging, and items stay neater longer.
Vertical folding, stacking clothes on edge rather than flat, transforms drawer capacity. The “KonMari” or file-fold method works: fold shirts or sweaters so they stand upright like files in a drawer. A 12-inch-deep drawer typically holds 8–12 vertical sweaters versus 3–4 stacked flat. Small wooden dividers or even cardboard shoe inserts act as shelf separators to keep items from toppling.
For hanging storage without traditional rods, closet organizers with cubbies or hanging shelves are practical. These hang from the main rod or hooks and compartmentalize smaller items, scarves, tanks, seasonal accessories, keeping them visible and easily retrievable. Make sure organizers are rated for the weight (check the tag) and that your main rod can handle the extra load.
Best Practices for Folded Clothing Storage
Folded clothing thrives in shallow, wide drawers or cubbies where nothing’s more than two items deep. Deeper drawers encourage stacking, which recreates the original problem. Store heavier knits like sweaters lower (gravity helps stability), and lighter items like t-shirts higher.
Label or color-code categories (work shirts, gym gear, underwear, socks) so household members return items to the right spot. This single habit prevents decay into chaos. Rotate seasonal items every three months, removing out-of-season clothing entirely to free drawer and shelf space. Storage containers with clear fronts help track inventory without opening every bin.
Add Lighting and Mirrors for Function and Appeal
Poor lighting sabotages even the best-organized closet. A single overhead fixture often creates shadows in corners and along the back wall, making color-matching and finding specific items frustrating. LED under-shelf lighting ($20–$60 per kit) installs in minutes and illuminates shelves below, reducing shadows dramatically. Battery-operated kits require no wiring: plug-in LED strips are brighter and suit any closet with a nearby outlet.
Mirrors serve dual purposes: they expand the perceived space and let you dress entirely within the closet. A 36 by 48-inch mirror mounted on the interior of the closet door works for most bedrooms. Smaller mirrors mounted on side walls or shelves reduce the footprint while still offering a quick outfit check. Use lightweight safety mirrors (not traditional glass) to avoid breakage and keep installation simple, adhesive strips or small brackets work fine on drywall or painted surfaces.
Task lighting near shelves or rods aids clothing selection, especially for matching colors and checking condition. A small clip-on reading light ($10–$20) mounts to a shelf edge if your main lighting falls short. Motion-sensor LED lights add convenience, flip open the door and light activates automatically, useful for groggy mornings or quick morning grabs. Modern motion sensors (some smart-home compatible) are affordable and retrofit easily into existing fixtures or plug-in units. Proper lighting and mirrors aren’t luxuries, they transform a closet from a dark storage box into a functional extension of the bedroom.
Conclusion
A well-organized bedroom closet isn’t magic, it’s a result of honest inventory, smart storage layers, and finishing touches that make the space function daily. Whether you’re installing a second rod, adding LED lighting, or implementing vertical folding techniques, each step builds on thoughtful assessment and practical execution. Start small, measure twice, and don’t skip the prep work. Your morning routine (and your wardrobe) will thank you.