Table of Contents
ToggleA concrete paver patio transforms a bare backyard into a functional outdoor living space. Whether you’re hosting gatherings, creating a quiet retreat, or adding home value, the right paver design sets the tone for how your family will use the space. Concrete paver patios offer durability, design flexibility, and easier installation than poured concrete, making them ideal for homeowners tackling this project themselves. This guide walks you through seven concrete paver patio ideas that balance aesthetics with practicality, along with installation tips to get the job done right.
Key Takeaways
- Concrete paver patios offer superior durability and design flexibility compared to poured concrete, with easier DIY installation for homeowners of all skill levels.
- Modern geometric patterns like herringbone and chevron designs create visual movement, while rustic stone finishes with earthy tones provide timeless, organic appeal for various home styles.
- Permeable pavers are an eco-friendly solution that reduces stormwater runoff and prevents ice damming, though they cost 20-40% more and require proper drainage base installation.
- Multi-colored paver combinations add visual interest without complex cutting—test color palettes at full size with sunlight exposure before committing to your design.
- Proper base preparation is critical to patio longevity; invest 4-6 inches of compacted base material, landscape fabric, and correct slope (1/8 inch per foot) to prevent settling and water pooling.
- DIY installation requires 2-4 days of labor and basic tools, but rushing the base, skipping landscape fabric, or ignoring water slope are common pitfalls that lead to premature failure.
Modern Geometric Patterns for a Contemporary Look
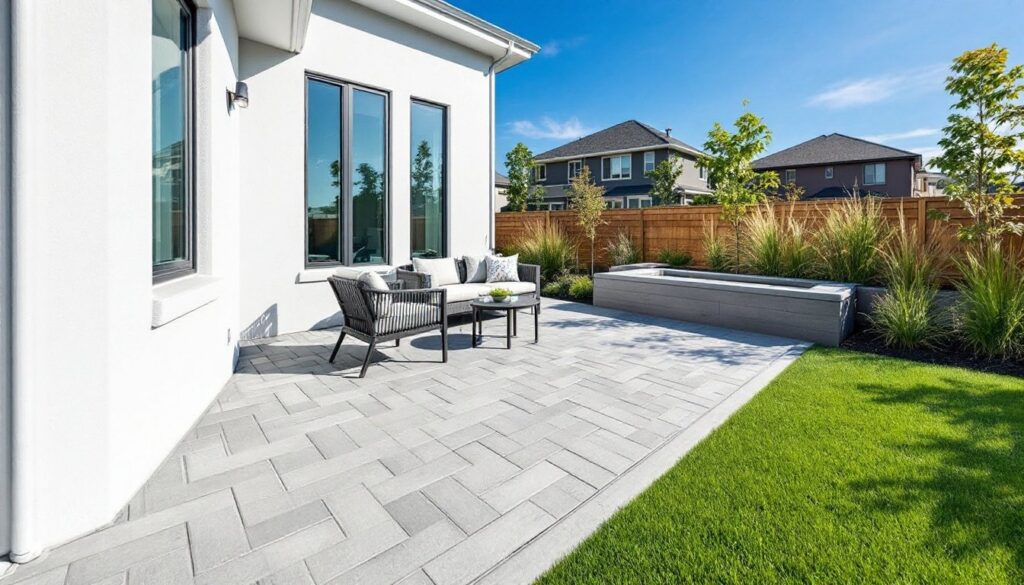
Clean lines and symmetry define modern patio design, and concrete pavers deliver this aesthetic with precision. Herringbone and chevron patterns create visual movement while maintaining a polished, minimalist feel. Running bond patterns, where pavers stack in offset rows like brick, offer simplicity without sacrificing visual interest.
To achieve this look, source uniform rectangular pavers in neutral tones: grays, charcoals, or even muted blues. The key is consistency in size and color. A 12×24 inch paver is standard for larger geometric designs, giving the pattern room to breathe. Pair stone with clean landscaping borders, steel edging or composite materials work well, to reinforce the geometric aesthetic.
Modern patios also benefit from subtle variation. Mix matte and light-brushed finishes within a color family to add depth without breaking the geometric theme. This approach prevents the space from feeling cold or sterile while maintaining that contemporary edge.
Rustic Stone Finish Designs for Timeless Appeal
Rustic stone finishes mimic aged flagstone or slate, bringing warmth and organic character to outdoor spaces. These pavers feature textured surfaces, irregular edges, and earthy colors, terracotta, tan, brown, and mottled gray tones, that ground a patio visually and emotionally.
Lay rustic pavers in random or “crazy paving” patterns, where pieces vary in size and fit together without rigid alignment. This method works especially well for cottage-style homes or garden-forward designs. The irregular edges create natural joints that feel intentional rather than haphazard. Allow slightly wider grout joints (½ to ¾ inch) to emphasize the artisanal quality.
Rustic patios pair beautifully with natural elements. Plant creeping sedums or moss between joints, add gravel pathways adjacent to the patio, and incorporate raised planting beds or stone benches. According to outdoor living space trends, this layered approach to garden design creates inviting, lived-in spaces that feel both elevated and approachable.
Permeable Pavers: Functional Eco-Friendly Solutions
Permeable pavers allow water to drain through joints and substrate, reducing runoff and supporting groundwater recharge. Made from porous concrete, recycled plastic, or stone with open grids, these pavers solve a real problem: standard patios shed water rapidly, overwhelming storm drains and eroding surrounding soil.
Permeable options include porous concrete pavers (which look like standard concrete but contain voids), plastic grid systems filled with gravel or grass, and reinforced grass pavers that stabilize turf while allowing foot traffic. Permeable pavers cost 20–40% more than standard options, but they’re increasingly required by local building codes in flood-prone areas or municipal stormwater management zones. Check your jurisdiction’s drainage standards before planning.
Drainage Benefits and Environmental Impact
Beyond stormwater management, permeable pavers reduce heat absorption, cooling the immediate area and reducing the urban heat island effect. They also prevent ice dam formation in winter climates, since water drains rather than pooling and freezing.
Installation requires a proper base: a 4–6 inch layer of pervious base rock topped with 1–2 inches of permeable sand (not standard mason sand, which clogs pores). Maintenance involves occasional vacuuming to clear sediment from surface pores. According to home improvement guides, permeable systems work best in climates with moderate rainfall: areas with heavy or sustained precipitation may overwhelm the drainage capacity.
Multi-Colored Combinations for Visual Interest
Blending multiple paver colors creates patterns that draw the eye and personalize your space without requiring intricate cutting or installation. This approach works especially well for larger patios where a single color might feel monotonous.
Two-color combinations are simplest: alternating dark and light pavers in a checkerboard pattern, or using a neutral base with colored accent borders. Three or four colors allow more creativity, think earth-tone blends (cream, rust, charcoal) or jewel tones (slate, terracotta, cream) that reflect regional architecture or personal taste.
Buy sample pavers and dry-lay them on cardboard or plywood at full size before committing. Sunlight changes how colors read at different times of day, and proximity to existing hardscape, siding, or landscaping affects visual harmony. Avoid overcomplicating the layout: simple geometric divisions (borders, bands, or blocks) work better than scattered random patterns. According to design inspiration resources, regional color palettes, incorporating local stone tones and architectural traditions, create patios that feel connected to place rather than imported.
DIY Installation Tips for Homeowners
Installing a concrete paver patio is physically demanding but achievable for motivated DIYers with basic tools. Plan for 2–4 days of labor, depending on patio size and soil conditions.
Materials and Tools You’ll Need:
• Concrete pavers (order 5–10% extra for cuts and breakage)
• Landscape fabric
• Pea gravel or permeable base rock (4–6 inches depth)
• Polymeric sand or regular jointing sand
• A level and straightedge
• Rubber mallet
• Circular saw with a concrete blade (for cuts)
• Wheelbarrow, shovel, and tamper
• Safety gear: goggles, dust mask, and gloves
Step-by-Step Process:
-
Excavate and prep the site. Remove sod and topsoil to a depth of 4–6 inches (depending on whether you’re using permeable base). Compact the soil with a plate compactor or hand tamper: loose soil causes settling. Slope the grade slightly (1/8 inch per foot) away from structures to shed water.
-
Lay landscape fabric. This blocks weeds without preventing drainage. Overlap seams by 6 inches and anchor at edges.
-
Spread and compact the base. Add 4–6 inches of pea gravel or crushed stone (not clay-based fill), then tamp in layers. This creates a stable, draining foundation. Uneven base is the #1 reason patios fail.
-
Dry-lay your pattern. Before setting pavers permanently, arrange them on the compacted base to verify your design and identify cuts needed. Mark cut lines with chalk.
-
Cut pavers carefully. Use a circular saw with a concrete blade, making multiple shallow passes rather than forcing a single cut. Wear a dust mask and goggles: concrete dust contains silica and is hazardous with prolonged exposure. Alternatively, use a hand-operated paver splitter for cleaner breaks and zero dust.
-
Set pavers in sand. Spread 1–2 inches of polymeric sand over the base (or regular masonry sand if you can’t source polymeric). Set pavers in the sand, tapping each with a rubber mallet to level it against neighbors. Check level frequently in both directions.
-
Fill joints. Sweep polymeric sand into gaps, mist lightly with water to activate the polymer, and allow 24–48 hours to cure. Regular sand requires occasional re-raking but is simpler for first-timers.
Common Pitfalls to Avoid:
• Rushing the base. A thinner or inadequately compacted base guarantees settling, especially in freeze-thaw climates.
• Incorrect slope. Water pooling on a patio creates slipping hazards and promotes weed growth in joints.
• Mismatched paver sizes. Even nominal variations (8×16 vs. 8×17) compound across a patio and break your pattern.
• Using patio base without fabric. Weeds will invade joints from below, and fabric keeps gravel from sinking into soft soil.
Conclusion
Concrete paver patios combine durability, design flexibility, and DIY-friendly installation. Whether you choose modern geometry, rustic appeal, eco-conscious permeability, or vibrant color combinations, the foundation, prep work, proper base, and attention to slope, determines success. Take your time during layout and installation, invest in a quality base, and your patio will serve your family reliably for decades. Start planning your ideal outdoor space today.