Table of Contents
ToggleTiny home kitchens present a unique challenge: creating a functional, inviting space in minimal square footage. Whether you’re living in a studio apartment, a small cottage, or a custom-built tiny home, the kitchen often becomes the heart of daily life, making smart design decisions essential. The good news? A compact kitchen doesn’t mean sacrificing style or capability. In 2026, homeowners are embracing clever storage solutions, efficient appliances, and thoughtful layouts that prove small kitchens can be both beautiful and highly functional. This guide walks you through practical ideas that deliver real results without requiring a major renovation budget.
Key Takeaways
- Tiny home kitchen ideas prioritize vertical storage, wall-mounted shelving, and multi-functional cabinets to maximize space without sacrificing functionality or style.
- Right-sized appliances—like slim refrigerators, two-burner ranges, and compact dishwashers—are essential for tiny kitchens, while multi-function tools replace single-use gadgets that waste precious square footage.
- The classic kitchen work triangle (sink, stove, refrigerator) remains highly relevant in tiny homes, with optimal distances of 3 to 9 feet apart to maintain efficient workflow and minimize wasted steps.
- Light colors, gloss finishes, and layered lighting (ambient, task, and accent) combined with reflective surfaces make tiny kitchens feel significantly larger and more open than their actual dimensions.
- Fold-down tables, continuous flooring colors, and positioning the sink near windows create visual continuity and prevent tiny kitchens from feeling cramped or isolated from living spaces.
- Starting with one or two practical changes—such as under-cabinet LED lighting or vertical shelving—delivers measurable improvements without requiring a major renovation budget.
Smart Storage Solutions for Compact Kitchens
Vertical Storage and Wall-Mounted Shelving
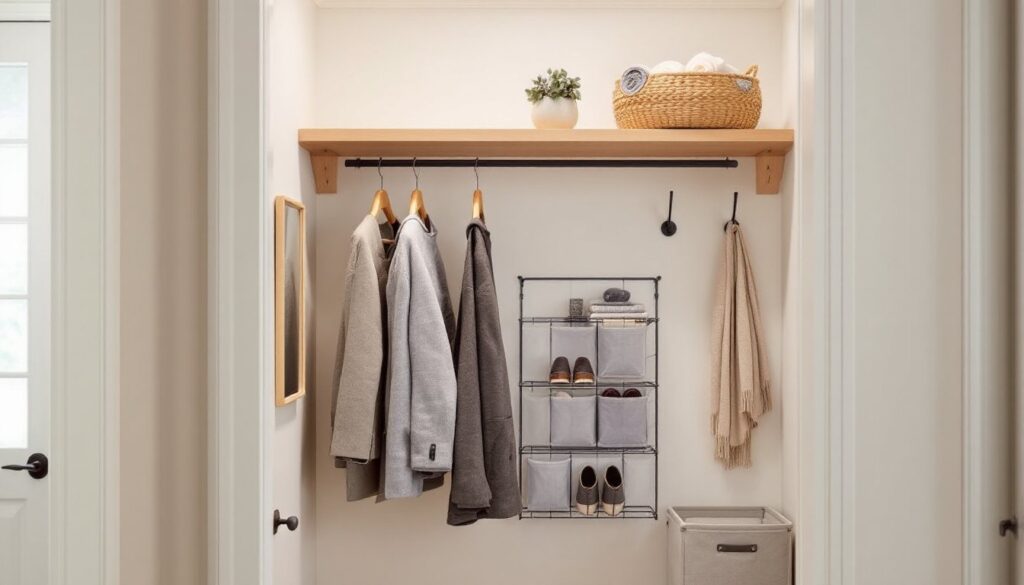
When floor space is precious, going vertical is your best friend. Open shelving mounted 12 to 18 inches below the ceiling keeps everyday items, mixing bowls, glasses, cookbooks, accessible without eating into counter real estate. Use sturdy L-brackets rated for 50+ pounds and locate studs in your walls: most kitchen items aren’t feather-light, so wall anchors alone won’t cut it.
Pull shelves 8 to 10 inches from the wall to avoid a cramped feel. Stack dishes vertically using plate dividers, this halves the space needed compared to laying them flat. The trade-off? You sacrifice a little visual openness, but gain serious storage density. Paint shelves the same color as your walls to make them recede visually.
Install a magnetic knife strip instead of a bulky knife block. It frees drawer space, keeps knives sharp (no dulling from loose movement), and makes them instantly visible. Mount it at arm height on an interior wall or the side of an upper cabinet.
Multi-Functional Cabinet Organization
Inside cabinets, think vertical stacking and pull-out hardware. Tiered shelf risers double the storage in upper cabinets, store mugs on the base shelf and drinking glasses above. Lazy Susans aren’t just for condiments: spin one in a cabinet corner and you’ve just recovered dead space that would otherwise go unused.
Pull-out drawers and sliding baskets transform deep cabinets into usable storage. Instead of reaching to the back and knocking things over, you get full visibility and access. A 9-inch deep pull-out basket in a 24-inch cabinet suddenly feels functional instead of like a black hole.
Use the inside of cabinet doors for spice racks, small shelf units, or adhesive hooks. That unused vertical real estate can hold measuring spoons, tea bags, or a mini wine rack. Just be mindful of weight limits, door hinges have load ratings, usually 25 to 50 pounds depending on the hinge.
Nesting storage containers and collapsible bowls cut clutter when not in use. Store them lid-side-up in a single deep drawer with a drawer organizer divider, you’ll find what you need without excavation.
Appliance Selection for Limited Square Footage
Cramped kitchens demand ruthless honesty about which appliances you actually use. A full-size refrigerator, gas range, dishwasher, and oven, the “big four”, are rarely optional, but everything else is fair game for downsizing or consolidation.
Consider a slim or compact refrigerator (24 to 28 inches wide) if you’re solo or a couple without bulk-buying habits. You’ll lose freezer volume, but counterspace matters more in tight quarters. Measure your doorways and corners before purchasing, a 28-inch fridge is useless if it won’t fit through your entry.
Two-burner or 30-inch electric coil or smooth-top ranges work well for tiny homes. They’re narrower than standard 36-inch models and use less counter clearance. Induction cooktops (smooth-top electric) are efficient and safer, but you’ll need ferromagnetic cookware (most modern pots and pans work fine).
A compact dishwasher (18 inches wide) or drawer-style dishwasher (24 inches) takes up less visual space than a standard model while handling 8 to 12 place settings. Some tiny home dwellers skip the dishwasher entirely and opt for a deep, wide sink instead, it’s a personal trade-off.
Multi-function appliances reduce clutter: a convection oven-microwave combo, an Instant Pot or multi-cooker, or a toaster oven can replace three separate tools. They don’t do everything perfectly, but they do most things well. Recent Home Renovation Ideas and Trends for 2026 highlight how homeowners are prioritizing dual-function items that save both space and energy.
Avoid single-use gadgets (breadmakers, ice cream machines, juicers). If something lives in a cabinet 11 months a year, it’s stealing square footage from something you actually need.
Layout and Design Strategies That Work
The classic kitchen work triangle, sink, stove, and refrigerator, remains relevant even in tiny homes, though the distances shrink dramatically. Aim to keep the three points no less than 3 feet and no more than 9 feet apart (most tiny home kitchens naturally fall within 6 to 8 feet). This prevents both wasted steps and cramped, inefficient flow.
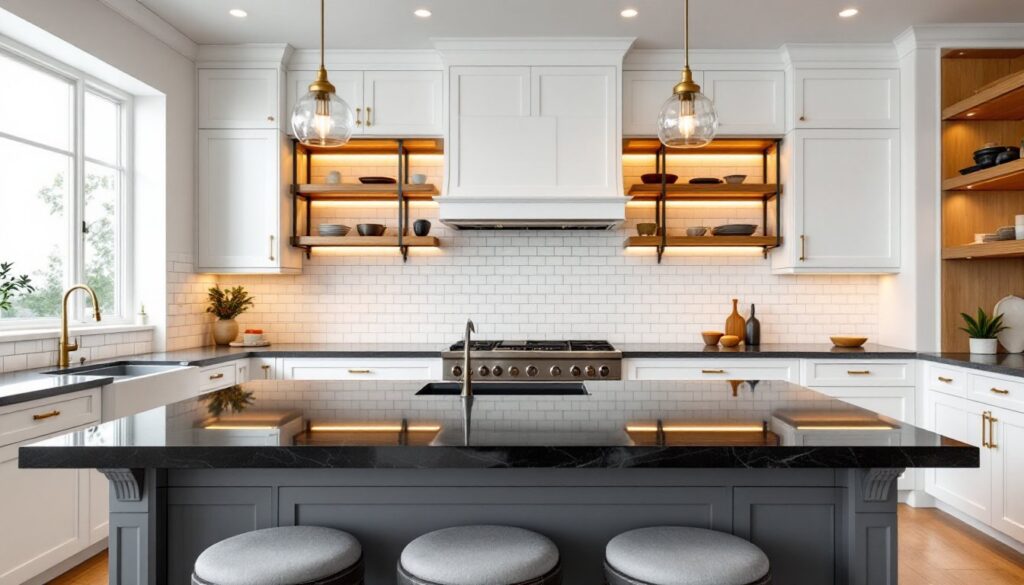
If your kitchen runs along a single wall, prioritize workflow order from left to right: prep zone (cutting board, counter), cooking zone (stove), and cleanup zone (sink). Countertops near the stove need heat-resistant material: granite, laminate, and butcher block all handle it fine.
A galley layout (kitchen on both sides of a narrow walkway) works if you have the depth, typically 8 to 10 feet. One wall holds cooking appliances: the opposite holds refrigerator and sink. This maximizes counter and storage while minimizing walking distance. Ensure clearance for cabinet doors and appliance doors so they don’t collide.
Counting on an Home Renovation Ideas Examples to guide tight layouts, many tiny home owners position the sink near a window for natural light and visual connection to living space. This simple trick makes the kitchen feel less boxed-in.
Use a fold-down wall table or breakfast bar to extend counter space and dining area without a permanent footprint. Mounted at 36 inches high on the wall, it folds flat when not needed. Most support 75 to 100 pounds and take up only 4 to 6 inches of wall depth when folded.
Flooring should be easy to clean (tile, vinyl, sealed concrete) and continuous in color/pattern with the adjacent living space, visual continuity makes a tiny kitchen feel less separate and cramped. Avoid a busy tile pattern that chops the room into smaller pieces visually.
Color and Lighting to Open Up the Space
Paint is your cheapest remodel tool. Light, neutral walls (soft white, pale gray, warm beige) reflect light and recede visually, making the space feel larger. Save bold accent colors for one wall, say, the wall opposite your entry, and keep cabinet and trim colors soft and cohesive.
White or very light cabinetry opens up a tiny kitchen dramatically. If full white feels sterile, try off-white, pale wood tones, or soft sage green. Dark cabinets absorb light and can make a compact kitchen feel cave-like, but a single dark accent upper cabinet or island can work if balanced with light walls and lots of light fixtures.
Gloss or semi-gloss cabinet finish bounces light around: matte finishes feel flat and can darken the perceived space. If going matte for a modern look, pair it with brighter wall color or extra lighting.
Lighting transforms a tiny kitchen from cramped to comfortable. Layer three types:
Ambient lighting sets overall brightness, a recessed ceiling light or flush-mount fixture works in tight quarters where pendant lights would hit your head. Aim for 50 lumens per square foot for kitchen task areas.
Task lighting targets your work zones. Under-cabinet LED strips (warm white, 2700K color temperature) illuminate counters without adding visual bulk and cost $15 to $40 per fixture. They’re plug-in or hardwired: plug-in versions require an outlet nearby.
Accent lighting adds depth and interest, a strip light above floating shelves or inside glass-front cabinets highlights décor without eating floor space.
Daylight matters too. If your window situation is fixed, reflective surfaces (polished stainless steel, mirrors) bounce available light around. A small mirror or mirrored backsplash behind your work zone multiplies perceived light and makes the space feel open. Recent resources like Remodelista’s guide on tiny kitchens emphasize how strategic lighting and reflective surfaces transform perception more than square footage changes.
Conclusion
Tiny home kitchens thrive on intentionality. Every choice, from wall-mounted shelving to appliance selection to paint color, serves both function and aesthetics. Smart storage, right-sized appliances, efficient layout, and thoughtful lighting combine to create kitchens that work harder and feel bigger than their dimensions suggest. Start with one or two changes, maybe vertical shelving and under-cabinet lighting, and observe how the space improves. Your small kitchen doesn’t have to compromise on capability or style.